 home
home
 Nederlandstalige beschrijving
GPS TrackManager
This page contains the
following sections:
The application is free for personal non-commercial use. Any donations are welcome to support maintenance and future developments.
Introduction
The GPS
TrackManager is an application developed by Write4u for planning routes and
managing routes, waypoints and trackpoints. The
program is free for personal non-commerical use. If you would like to use the
program as a tool in your occupation you will have to buy a license. Please
contact me in this case.
The application support functions such as:
- Open and save trackpoints files in various formats
(GPX, Ozi Trackpoint file, Ozi Waypoint file, NMEA log, EasyGPS file).
- Transmit Trackpoints, Waypoints and Routes to Garmin GPS receivers
(Geko 201, GPSmap 60C).
- Save Trackpoints as TXT file (pushpin import file) to be imported
in AutoRoute.
- Read Trackpoints from Excel-file (CSV).
- Transmit Trackpoints as NMEA RMC messages.
- Create NMEA logfile on the basis of a Tracklog. You can use
parameters such as driving speed and message interval time.
- Split/Correct/Filter NMEA logfiles
- Receive, decode, log and transmit NMEA messages.
- With the aid of AutoRoute plan a route and convert it to a
tracklog file for use in your GPS receiver. This is specially usefull for
GPS receivers that do not support maps.
- Plot graphs from tracklogs: track, time/way diagram, time/height
diagram, time/speed diagram.
- Open and Save Google Earth KML files.
- View current Waypoints and Tracks in Google Earth.
The application is available in the Dutch and English language. Other translations
can be delivered on request. You can also make a translation yourself because
all language dependent strings are stored in a separate INI file.
The application can be downloaded
here.
 The
GPS TrackManager can be used in combination with AutoRoute for the planning
of routes (tracklog) and the analysis of travelled tracklog.
The
GPS TrackManager can be used in combination with AutoRoute for the planning
of routes (tracklog) and the analysis of travelled tracklog.
Screens
The
following section provide an overview of the various screens of the application
and corresponding functions. For each screen the main functions are explained.
Tree
structure

The tree structure provides
an overview of the various types of points that can be stored in a GPX file.
The formatting is based on the GPX format. The points are divided into: Waypoints,
Routepoints and Trackpoints.
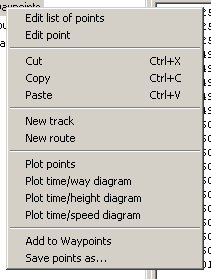
Though the context menu (right mouse button) in the tree view, the following
functions can be accessed:
- Edit list of
points: Edit the points of the selected node. These points can be waypoints,
routepoints or trackpoints. The points will be shown in the tables of the
Points tab and can be edited, deleted and copied.
- Edit point: Shows the selected point in the points editor.
---------------
- Cut: Remove the selected node from the tree.
- Copy: Copy selected node to the clipboard.
- Paste: Paste nodes into the tree.
---------------
- New track: Creates a new (empty) tracklog under the Trackpoints
node. Use the function "Edit list of points" to add points to the tracklog
by copy and paste, for example, from another tracklog.
- New route: Creates a new (empty) route under the Routes node.
Use the function "Edit list of points" to add points to the route. These points
can be copied, for example, from the Waypoints tab.
---------------
- Plot points: Plots the points of the selected node (Tracklog,
Route or Waypoints). The plotted points are drawn on the "Plotting ponits"
tab.
- Plot time/way diagram: Plots the points of the selected node
as a time/way diagram. This diagram shows the speed you travelled. The more
vertical the line, the slower you travelled.
- Plot time/height diagram: Plots the points of the selected
node as a time/height diagram. This diagram shows the changes in height during
your trip. This is a very nice feature for bikers.
- Plot time/speed diagram: Plot the points of the selected node as a time/speed diagram. This diagram shows the changes in speed during your trip.
---------------
- Add to waypoints: Adds the selected point (Waypoints, Trackpoint)
to the Waypoints tab. If a point already exists with the same co-ordinates,
a warning is given.
- Save the selected node as a separate file.
Points
The
points tab gives an overview of the selected points. You can perform a number
of functions with this list, see context menu of the list. Most functions speak
for themselves.
Double click on a row in the table to edit the data (or select "Edit"
in the context menu). By selecting multiple points and then choosing the menu
"Edit", you can modify one or more fields for all selected points
at once.
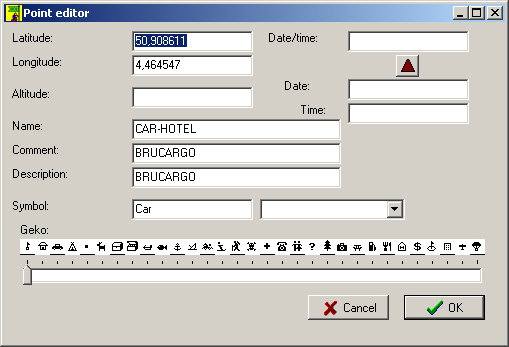
Depending on the type of point you are editing, certains field are not usefull
to fill in. The bottom row of symbols is specific for the Geko GPS receiver.
The pull-down list behind the label "Symbol:" gives a more extensive overview
of symbols. It depends on your GPS receiver whether or not a symbol is available.
If you select a symbol that is not available, this is replaced by the standard
waypoint symbol in most cases.
When you have selected multiple points, a checkbox is displayed in front of
a number of fields. All fields that have their checkbox checked will be changed
for all selected points.
NMEA
reception
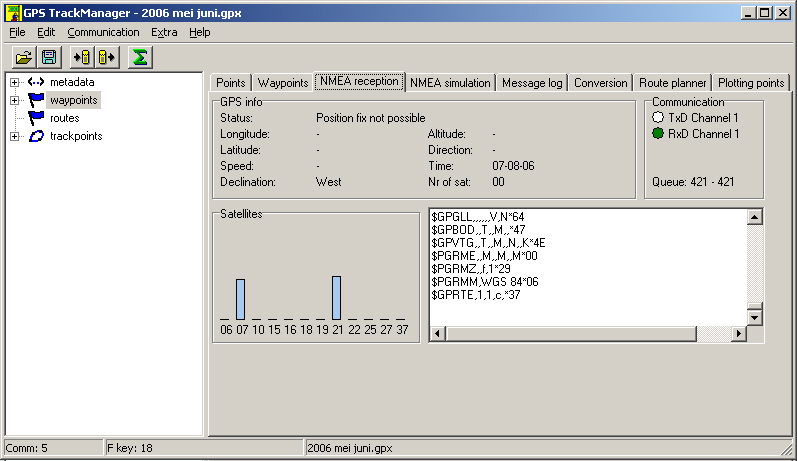
This tab displays
the most important NMEA messages that are received through the communication
port, in readable text.
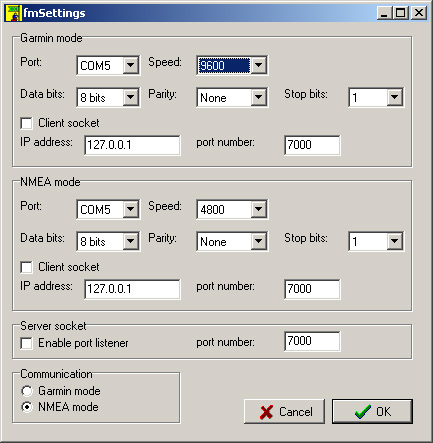
The settings for the communication port can be changed through the menu "Communication
- Settings".
You can set communication settings differently for Garmin mode communication and NMEA mode communication. It is also possible to communicate via TCP socket connection. In this way you can send/receive messages to and from another computer in your network.
The communcation mode (Garmin/NMEA mode) is selected automatically in most cases. It is also possible to select the mode manually. Some functions, however, will reset you manual selection.
NMEA
simulation
On
this tab you can control the NMEA simulator. The following options are available:
The date/time field that is part of the RMC-messages can be one of the following: original time, start from, current time.
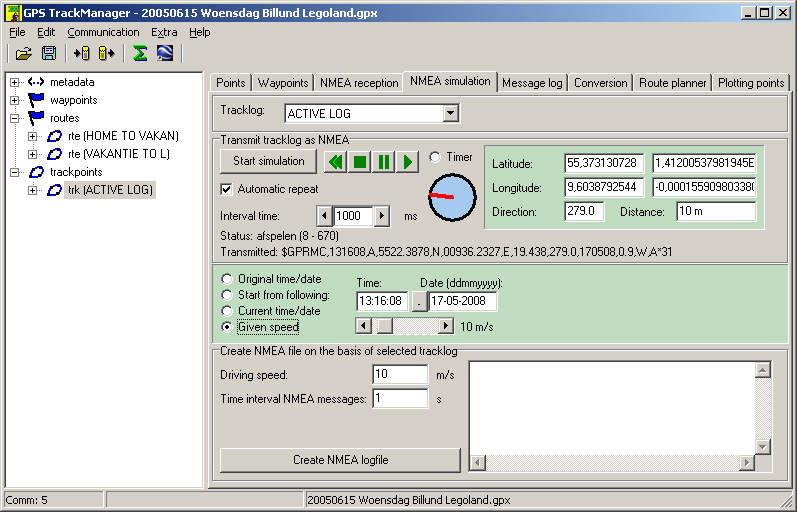
Transmit
tracklog as NMEA
All
points of the selected tracklog (picklist "Tracklog") will be transmitted as
NMEA RMC messages through the communication port. You can use this function
to transmit a previously recorded NMEA logfile for the purpose of simulation.
You can, for example, connect the communication port to another computer (or
a second communication port on the same computer) by means of a null-modem cable.
If you start some route planning software with NMEA support, the driven track
will be simulated on the map.
Before you can start the simulation, you must select one of the loaded tracklogs
from the "Tracklog" picklist. After this you can click on the [Start simulation]
button to start the simulation. Use the buttons [pause] and [play] to temporarily
stop and resume the simulation. Use the [stop] button to abort the simulation.
Use the button [rewind] to step 10 records back in the tracklog.
The simulation speed can be set with the "interval time". Do not select an interval
that is too small otherwise more information is provided to the communincation
channel than can be transmitted (depending on the communication speed). The
interval time can be changed during the simulation.
Use the checkbox "Automatic repeat" to indicate that the simulation
has to restarted when it is finished.
Create
an NMEA file on the basis of a selected tracklog
Use
this function to create a new NMEA logfile on the basis of an existing tracklog.
You can specify the driving speed that is used to drive the selected track.
Also you can specify the interval time for generating the NMEA messages.
The start time and date of the NMEA logfile will be one of the following: original time, start from, current time.
Press the button [Create NMEA logfile] to start the function. You will be asked
to enter a filename for the logfile that is to be created. This file is automatically
provided with the ".log" extension. A report is given when the file is generated.
The RMC-messages are shown in the memo field during the generation.
Keep account with the fact that the NMEA file can be many times larger than
the original tracklog file if a relatively short interval time is selected (for
example 1 second).
Message log
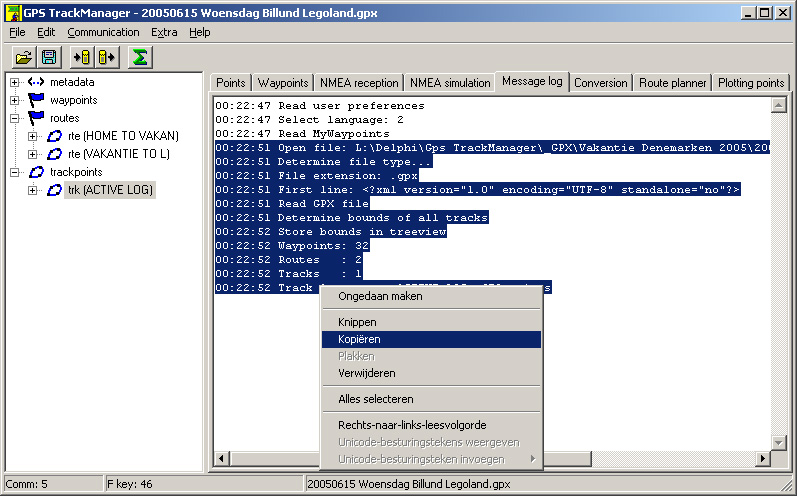
This
tab gives an overview of all received and transmitted NMEA messages. The received
messages can also be written to a logfile. Select the menu option "File
- Logging" to start and stop the logging.
If you want to copy parts from this field, first select the text and then select
"Copy" from the context menu. Please note that copying with the keyboard
shortcuts Ctrl+C does not always function in the field!
Conversion
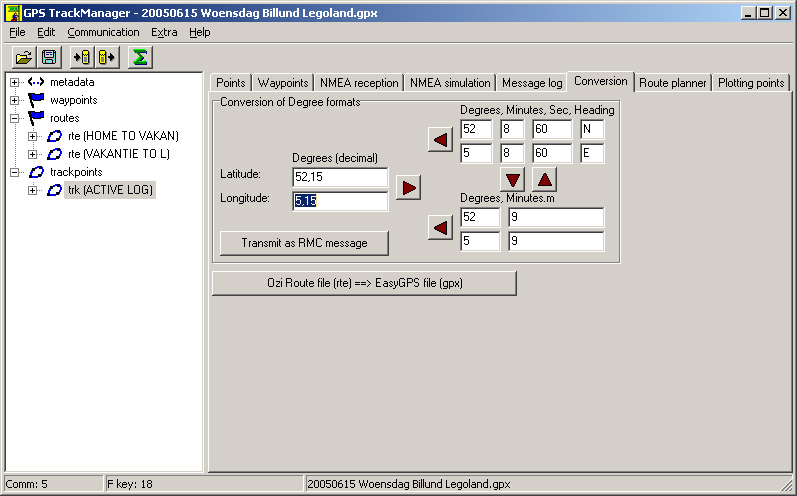
The
tab "Conversion" enables you to enter a latitude and longitude to
convert it to various notations. Use the button [Transmit as RMC message] to
transmit the entered co-ordinate via the communication channel as an NMEA RMC
message.
The button [Ozi route file (rte) ==> EasyGPS file (GPX) converts an Ozi route
file to a format that can be read by the GPS TrackManager.
Route
planner
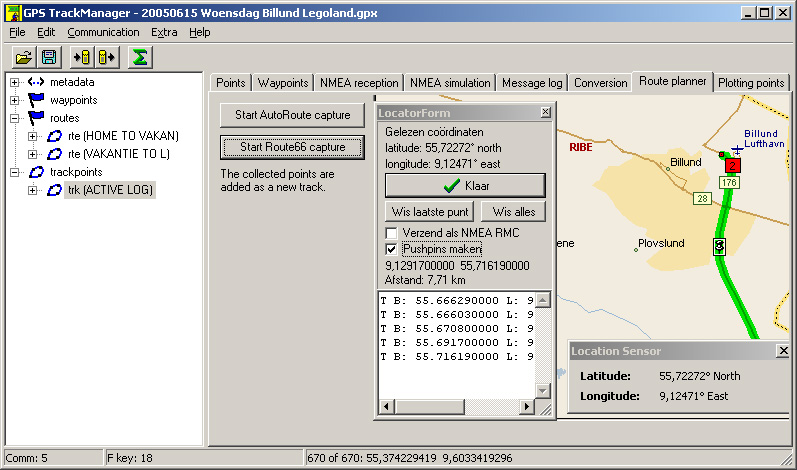
The
route planner enables you to create a tracklog with the aid of route planning
software (Route 66 or AutoRoute). By loading the tracklog into a GPS receiver
you can drive the planned route by following the dotted line on the display
in an area you have never been before.
Note: The 'Route 66 capture' function only supports the 2002 version of Route 66. Later versions of Route 66 use anti-aliasing which disables the proper functioning of the ocr-function. When using AutoRoute, you do not have these problems because the co-ordinates can be read from 'Location sensor' window without the use of ocr.
It functions as follows:
- Plan the route as usually. After it has been calculated, the
route will be marked on the map.
- Zoom in on the map to alow you to see sufficient detail. By
doing this the entire route will no longer fit in the window, but this is
not a problem. Switch off the "Directions" to view a larger part
of the map.
- Select the "Pan" tool in AutoRoute (hand symbol in
button bar). This enables you to pan easier with the mouse during the collection
of points.
- Click on the button [Start AutoRoute Capture] in GPS TrackManager.
The GPS TrackManager application is now hidden and a small window (LocatorForm)
is show in the lower left corner on your screen. This window will be collecting
the various GPS points.
- When the "Location Sensor" of AutoRoute is not yet
activated, the GPS TrackManager will do this for you.
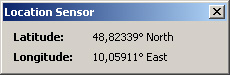
- When you move your cursor over the map, the GPS co-ordinates
of the pointed location is shown in the Location Sensor of AutoRoute. These
co-ordinates are automatically copied to the "LocatorForm" of the
GPS TrackManager.
- Select the checkbox "Create pushpins" to automatically
create pushpins for every trackpoint you select.
- Press on the keys "T" or "W" to copy the
current GPS co-ordinates as a Trackpoint or Waypoint. If you select a waypoint,
you will be prompted for a name for the waypoint. The collected points are
placed in the lower field of the "LocatorForm". Above that, the
calculated distance between all trackpoints is indicated. The Waypoints will
not be used for calculating the total distance. If you have checked the "Create
pushpins" checkbox, automatically a pushpin is entered at the location
of the mouse pointer at the time you pressed the key. AutoRoute will automatically
pan the map to center the new pushpin. In most cases the first pushpin is
not created correctly. Remove this pushpin manually and close the "Find"
dialog of AutoRoute if it was left open. Press the button [Erase last point]
to remove the point from the LocatorForm. Following pushpin will be created
correctly in most cases.
- Use your cursor to trace the entire route while pressing the
"T" or "W" keys repeatitly to create trackpoints and waypoints.
Make sure to create sufficient trackpoints to follow curves in the route.
Experience has shown that it is important to create a waypoint just before
an exit on the highway. This enables you to recognize the exit in time to
allow presorting. When panning the map, remember where you captured your last
trackpoint.
- If you have collected sufficient points, press the [Ready]
button. The list of points is not added to the tracklog named "ACTIVE LOG".
If there is no tracklog by this name, it will be created.
- Transmit the points (trackpoints and waypoints) to your GPS
receiver, place the receiver in your can (or on your bike and drive to the
planned destination.
This procedure has allowed me to find numerous location in areas
where I have not been before without taking detours or having to ask for directions.
Remark: During the collection of points with the "LocatorForm"
the keys T and W are registered as hotkey in Windows. This applies to all running
applications. This means that you can not switch over to another application
to type some text because the keys will not function!
Navigation by means of a tracklog with
a GPS receiver does require some pratice. For example, recognizing the correct
exit on highways is not always easy. You can see if you have to make a left
or right turn, but you do not know whether to take it before of after a bridge.
By making additional Waypoints you can add some clues for yourself.
Plotting
points
This tab show the various
types of graphs that can be drawn. The drawing can be initiated through the
context menu in the tree view. You can create the following graphs:
- track
- time/way diagram
- time/height diagram
- time/speed diagram
These graphs are a usefull aid in analysing
driven tracks. The following gives a short explanation for each type of graph.
Plot points
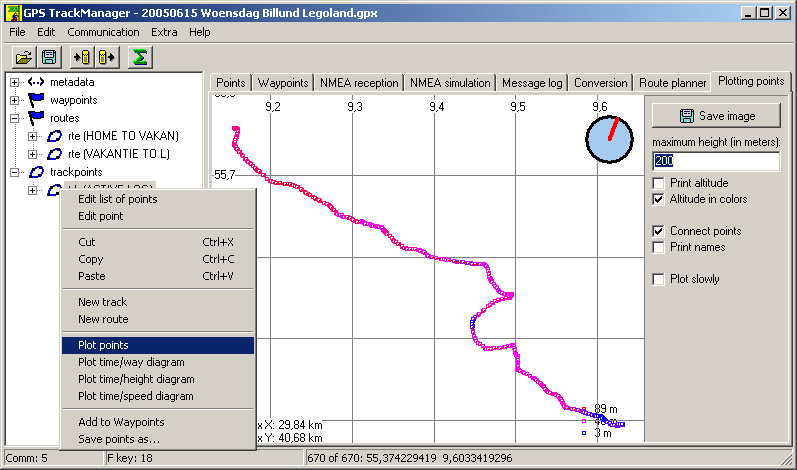
This allows you to plot a graphic overview
of the selected track. All points are plotted as a small square. You can choose
to connect the points. By means of color (runnng from blue to magenta to red)
the height of each point is indicated. By selecting the function "Plot
points" again while the waypoints node is selected, the waypoints are added
to the graph. By first selecting the option "show names", also the
names of each point is plotted.
Plot
time/way diagram
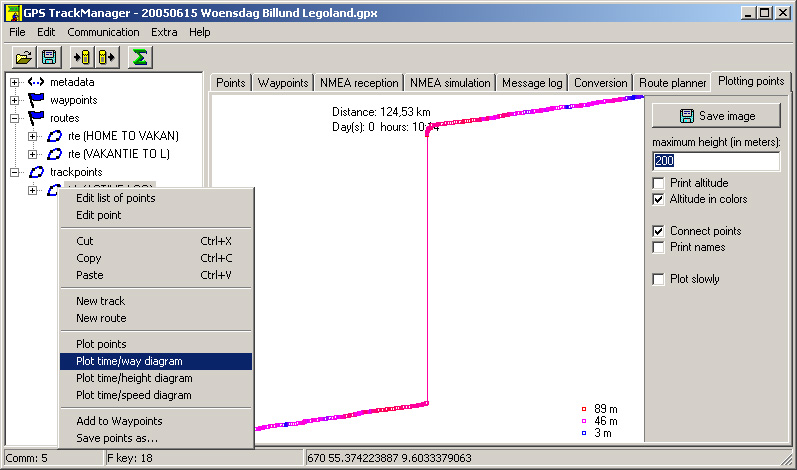
This function shows a time/way diagram
of the selected tracklog. A time/way diagram is a graphic display of the speed
during the trip. The more vertical the line is, the lower the speed was. A vertical
line indicates a stop.
Also in this graph, the height is indicated with colors.
Plot time/height
diagram
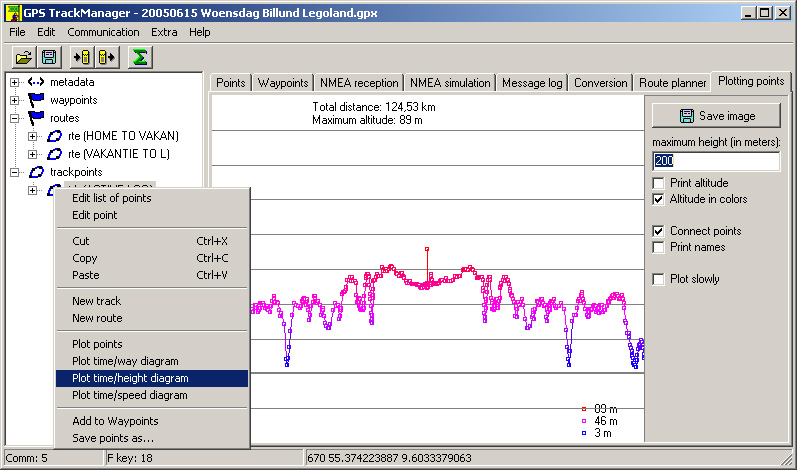
A
time/height diagram gives a graphical representation of the heights on the track.
This feature is specially like by cyclists.
Plot time/speed diagram
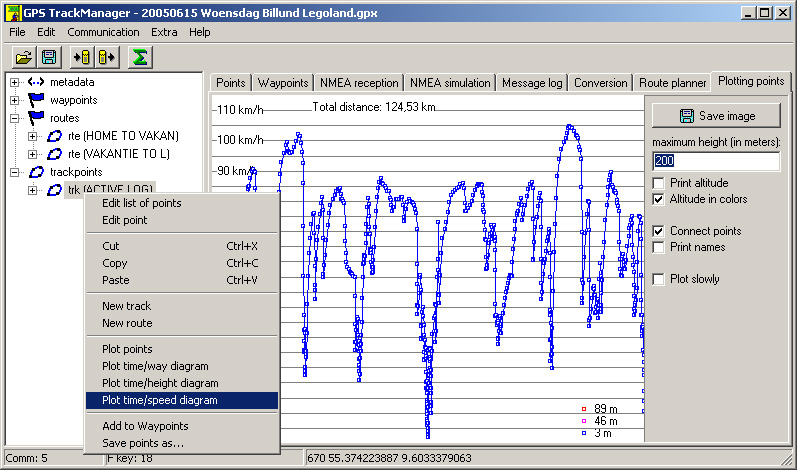
A time/speed diagram gives a graphical representation of the speeds on the track. The displayed speed is filtered to prevent extreme values.
Communication
The
GPS TrackManager application supports two communication protocols:
- NMEA
protocol
- Garmin protocol
The menu "Communication
- Settings" allows you to set the COM-port and the parameters that are to be
used during the communication. In most cases the communication port is opened
automatically with the correct protocol. If you want to open the communciation
port manually for a specific function, use the following procedure:
- Select "Communication - port closed".
- Set the parameters by means of the menu option "Communication
- Settings".
- If required select correct protocol with the
radiobutton and close the window.
- Select "Communication - port open".
Register
GPX Extension
You can register the
GPX file extension to the GPS TrackManager application. This allows you to open
GPX files from the explorer by double clicking them. The registration is done
through the menu option "Extra - Register GPX extension".
After a new installation of the program you will be prompted once to register the GPX extension.
When you move the GPS TrackManager application to a different directory on your
computer, you will have to execute this function again.
You can also open GTM, PLT, WPT, CSV and TXT files with the GPS TrackManager by means
of the explorer. Select the file in the explorer with your right mouse button
and select "Open with - GPS TrackManager".
Select
language
At the moment the application
is available in two languages: English and Dutch. You can change the language
run-time through the menu "Extra - Language".
Most text strings used by the application are defined in the GpsTrackManager.ini
file. If you want to add a language, you can do that in this file. When you
add a new translation, I would appreciate it if you mailed the translations
to me. This way I can add it to a new release.
Use the menu option "Extra - Export application strings for translation" to save all text strings in an Excel file (CSV). After translation, you can mail the file to me, so I can integrate your translations in the application.
Installation
The Setup will automatically
install the program on your computer.
If you want to install
a new version of the program, you have to install the previous version first
(Control panel - Add/remove programs). Your settings and waypoints will remain
on your computer when removing the program.
When you run the program
for the first time, it will ask you if you want to register the GPX extension.
If you want to do this at a later stage, select the menu option "Extra
- Register GPX Extension".